
 The two environmental
factors that most control the well feeling of people are temperature and
humidity. Thermometers can be easily bought or built, but hygrometers are
somehow a bit less common. Still, it is possible to build a simple electronic
hygrometer, that is inexpensive and quite accurate - at least, it's many,
many times better than the old fashioned mechanical things based on women's
hair, horse tails, swelling pieces of wood, or any of the many other measuring
principles people have invented over the centuries!
The two environmental
factors that most control the well feeling of people are temperature and
humidity. Thermometers can be easily bought or built, but hygrometers are
somehow a bit less common. Still, it is possible to build a simple electronic
hygrometer, that is inexpensive and quite accurate - at least, it's many,
many times better than the old fashioned mechanical things based on women's
hair, horse tails, swelling pieces of wood, or any of the many other measuring
principles people have invented over the centuries!
The meter described here employs a Honeywell sensor IC, based on thin-film polymer capacitor technology. It's very convenient because it delivers a conditioned and rather well calibrated output signal which is almost linearly related to the relative humidity of the air surrounding it. The sensor does have a small temperature coefficient, and a significant non-linearity at very low humidity levels. These have been neglected in the present simplistic design, but even so the results are accurate enough.
The climate I live in is very humid. So I purchased a dehumidifier, which is basically a little machine that sucks the excess water out of the air and deposits it in a tank or drain hose. But this eager little machine loves to work overtime, and leave the air too dry! So I built my hygrometer for a dual purpose: It is both a handheld battery-powered hygrometer, and a controller for a dehumidifier! When controlling the dehumidifier, it takes its power from it, and so uses no batteries.
T (°C) Water (g/m³)
-----------------------
-20 0.9
-10 2.1
0
4.9
10 9.4
20 17.3
30 30.4
When the amount of water in the air is more than the stated amount for a given temperature, the air cannot hold that water, and little droplets form, which fall to the ground. That's called rain! When the air is holding just the maximum possible amount of water, it's said to be saturated. That's the same as saying that the relative humidity is 100%. So, the percentage of relative humidity expresses how much water there is in the air, compared with how much there could be before it starts condensing!
The saturation point can be reached by two ways: One is by adding humidity to the air (such as with a boiling kettle, a stove burning a fuel containing hydrogen compounds, or a breathing person). The other is by taking a volume of air with a fixed amount of water in it, and cooling it down. In both cases, eventually water droplets will form.
If there is any object in the air which is cooler than the air itself, such as a window exposed to cold outside weather, then condensation will form on the object, even before the air reaches saturation. The temperature at which an object will become wet is called the dew point, and depends strictly on the absolute humidity of the air, which in turn is just the amount of water in the air, regardless of temperature.
Confused? Let me give you an example, with real numbers: Suppose
that your home is heated to 20°C, and that the air happens to contain
10 grams of water per cubic meter. Considering that the air at 20°C
can hold up to 17.3 g/m³, the relative humidity is 58%. This 58% is
what my meter would show. By the way, that's quite a comfortable environment
to have.
The dew point would now be near 11°C, because that's the temperature
at which 10g/m³ would saturate the air. This means that if anything
in your home (such as the windows, a cold water pipe, the fridge door)
gets as cold or colder than 11°C, it will become wet with condensation!
If your home is very well insulated, that won't happen. But what if
you just keep living there, without ventilating? As soon as you add an
additional 7.3g of water for each cubic meter of air, everything
will start getting wet! You might actually see fog forming in the middle
of your living room! Not nice...
So, it's clear that it is necessary to hold a good humidity in your home, in addition to a good temperature. And that's where this handheld hygrometer comes in, both to monitor the humidity, and to control a dehumidifier, if necessary. Oh yes, if you live in a very dry climate, you could control the inverse kind of machine, a humidifier, by reversing the control function!
But how much humidity is good? Well, people feel most comfortable at humidities between roughly 50 and 70%. Below roughly 50% the lips, ayes and skin dry out, and sparks from static charge start happening. Above 70% you feel sticky hot as soon as you start moving, and clammy cold as soon as you sit down for a while.
Objects instead like lower humidities: At 70%, some fungus can already
grow on many surfaces in the home, fed just by dust and airborne humidity!
Above 80%, fungus is very active (and smelly!). So, it's better to stay
below perhaps 60%, where fungus is mostly inactive. But too little isn't
good either: Below about 40% paper becomes brittle, wood can crack (ask
any piano repairer!), and sparks from electrostatic charges can kill electronic
equipment. So, I think that the optimal relative humidity to keep in one's
home is roughly 50 to 60%.
Here
is the schematic diagram of my hygrometer. You can click on it to get a
larger, better, printable version. Let's start from the right side: A 9V
battery powers the circuit through a pushbutton and a diode, or alternatively
it can get power from a dehumidifier or power supply, via a DIN connector
and another diode. The external power can be anything from about 8 Volt
up to 30 Volt, but the nominal, well tested value is 12V. It doesn't need
to be regulated - in my dehumidifier I installed a simple power supply
with a 9V transformer, bridge rectifier and 1000uF filter capacitor.
There is a small 5V regulator, which powers the voltage-sensitive circuitry. Please note that there are different pin numbering conventions for the 78L05! So check the data sheet, and if you see a disagreement between my pin numbers and what the data sheet indicates, identify the pins by input, output and ground, rather than numbers...
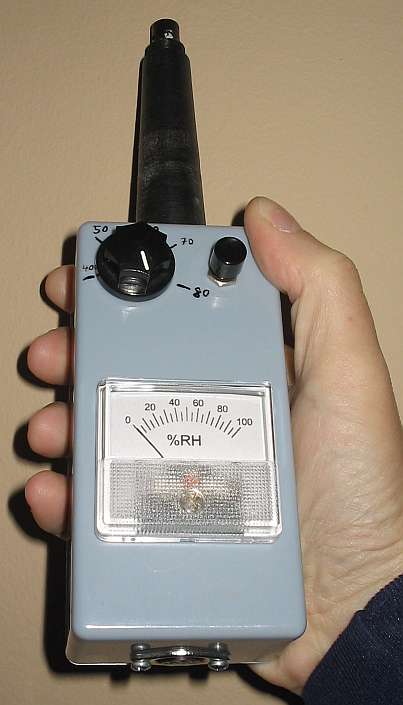
The regulated 5V feed the HIH3610 relative humidity sensor. The output of the chip, which doesn't have a great current sourcing capability, is buffered by a low power operational amplifier. From here, a classical galvanometer is driven, with one adjustment for the zero point and another for the gain. If you can't get a 50 microampere meter like I did, you can use a different one, adjusting the values of R2 and perhaps R1 as needed to get it to full deflection at 100% humidity. I drew a new meter scale on the computer, printed it and installed it in the meter, so it looks quite good and is practical to use.
The buffered voltage representing humidity is also applied to the second section of U1, which works as a Schmitt trigger comparing the present humidity to a reference value coming from a potentiometer. With the values shown, the set point can be adjusted from about 40% to 80%RH. According to this comparison, this op amp controls a transistor which in turns controls a power relay installed inside the dehumidifier. R10 sets the hysteresis between switch-on and switch-off. The 330k value shown gives roughly 5%RH hysteresis, which is good for accurate control but a bit tight if you use a powerful dehumidifier in a small room. In that case, better reduce the resistor to 220k, or 150k, which will give proportionally larger hysteresis.
The dehumidifier connected to J1 should put pins 2 and 4 to ground. It should provide a supply of roughly 12V at pin 3, and should have the coil of a 12V relay connected between the 12V and pin 1. There should be a freewheeling diode in parallel with the relay coil (cathode to +12V).
If you don't want to control any external device, of course you can
eliminate R6 to 12, D1 to D3, Q1, and J1. If you use a very sensitive meter
(less than 30µA full scale), you can even eliminate U1, and feed
the meter directly from the sensor. Adjust R2 up in that case. The meter
becomes really simple in this case!
 I built my hygrometer
into an inexpensive plastic project box. The pushbutton was installed so
that it can be easily pressed with the thumb. The sensor was installed
in a rather fancy support made on my lathe from black polyamide. The tip
of it, complete with sensor, can be seen in this magnified photo. The sensor
is sensitive to light, giving wrong readings when exposed to direct sunlight
or other strong light sources! That's why I designed this rather fancy
support, shown here without the top cover. It allows air to freely circulate
around the sensor, while completely cutting out any light when the cap
is on.
I built my hygrometer
into an inexpensive plastic project box. The pushbutton was installed so
that it can be easily pressed with the thumb. The sensor was installed
in a rather fancy support made on my lathe from black polyamide. The tip
of it, complete with sensor, can be seen in this magnified photo. The sensor
is sensitive to light, giving wrong readings when exposed to direct sunlight
or other strong light sources! That's why I designed this rather fancy
support, shown here without the top cover. It allows air to freely circulate
around the sensor, while completely cutting out any light when the cap
is on.
Of course, you don't need to to it this way! I did it just because I love to play with my lathe! (But next time I will sharpen the cutting tool in order to get a smoother surface!). Any mount that keeps the sensor reasonably dark, in good contact with ambient air, and far away from any heat source, will do.
I did not make a printed circuit board. The circuit is so simple that it wasn't worth the effort! Instead I assembled it on a piece of prototyping board.
I got a large bag (about half a kilogram, probably pure overkill!) of silica gel, encased in fabric, and dried it in my electric oven for several hours at slightly over 100°C. Then I placed the silica gel in a closed plastic bag, let it cool, and then poked the sensor into the bag, sealing the bag against the sensor mount with rubber bands. I let it sit there for half an hour. This method produces a humidity very close to zero. I set the zero trimpot (R4) so that the meter shows just a tad above zero.
Then I took some distilled water, placed it in a clean dish, took the silica gel out of the bag, placed the dish with water in, and re-sealed the bag, with the sensor rather close over the water surface. I let that stand for several hours, so that all temperatures would equalize and the system would reach equilibrium. Then I set the gain adjustment trimpot (R1) so that the meter shows exactly 100%.
You can check the linearity by replacing the distilled water with saturated
salt solutions. Each kind of salt gives a very specific humidity. But you
need pure salts! Unfortunately table salt comes laced with additives that
make it unsuitable for calibration. But if you can get pure sodium chloride,
that should give something near 75%RH. Lithium chloride gives close to
30%, if my memory isn't kidding me, but check the precise values on some
other web site if you want to do these linearity checks!